News:

Welcome Rad Power Bike owners!

Buying a Rad Power Bike? Support the forum and use my affiliate link: https://bit.ly/2VMSVHl

Be sure to sign up for a free account to see posted images.

Note: To help support to ongoing costs of running
the site we use Amazon affiliate links.

Main Menu
Menu

Show posts

This section allows you to view all posts made by this member. Note that you can only see posts made in areas you currently have access to.

Show posts Menu

Topics - Altema

#41
Rad Modifications / Rack battery accessory power
February 10, 2021, 08:31:55 AM
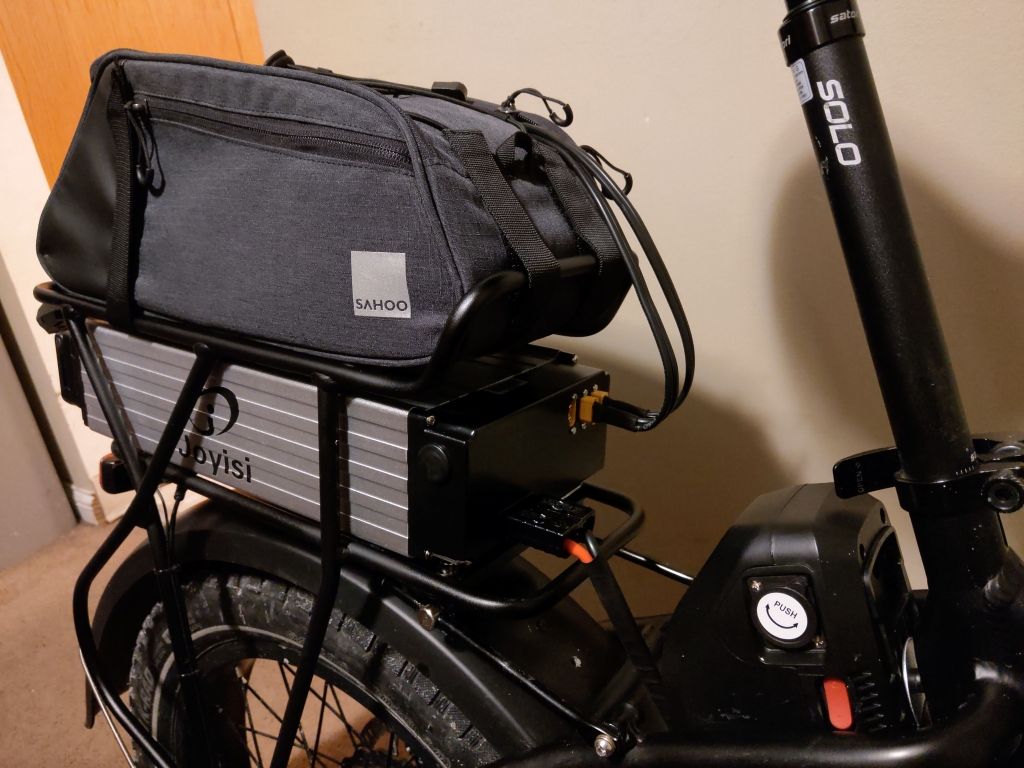
Since I no longer had a power connection inside my rack bag, I decided to add some accessory connections to the front housing of my new rack battery.
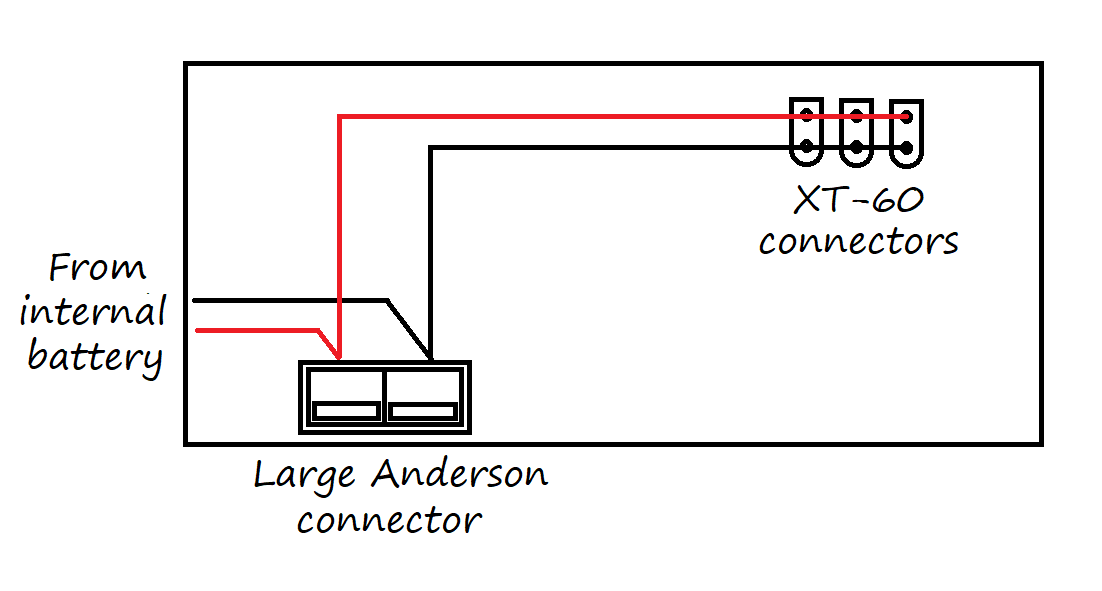
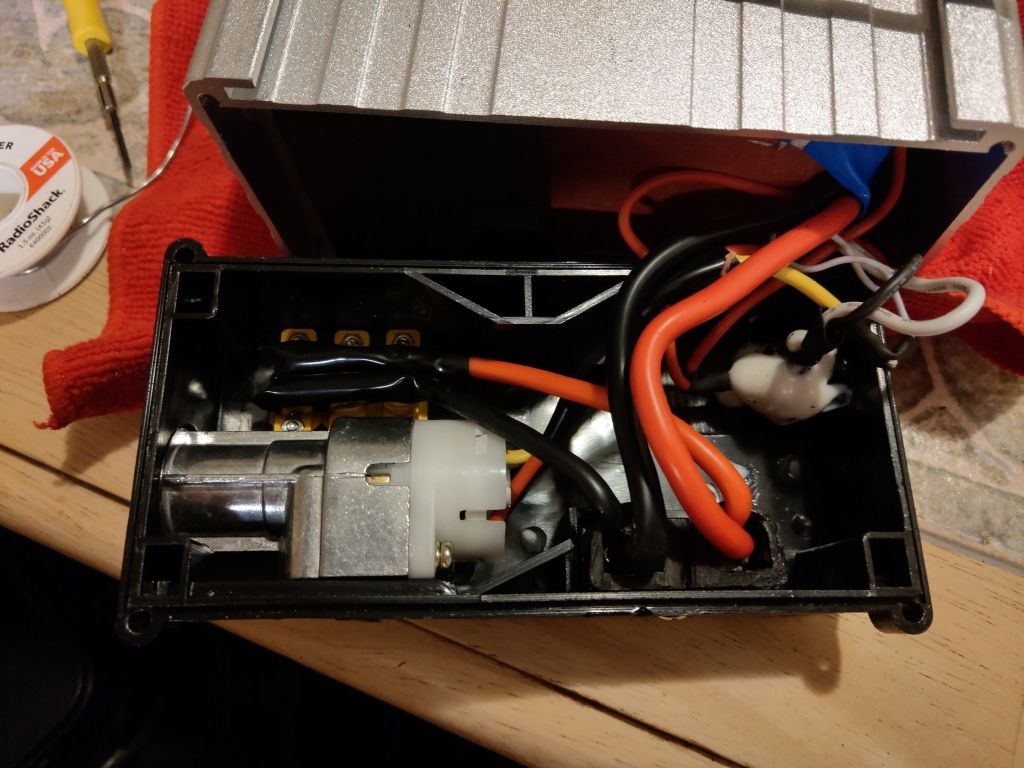
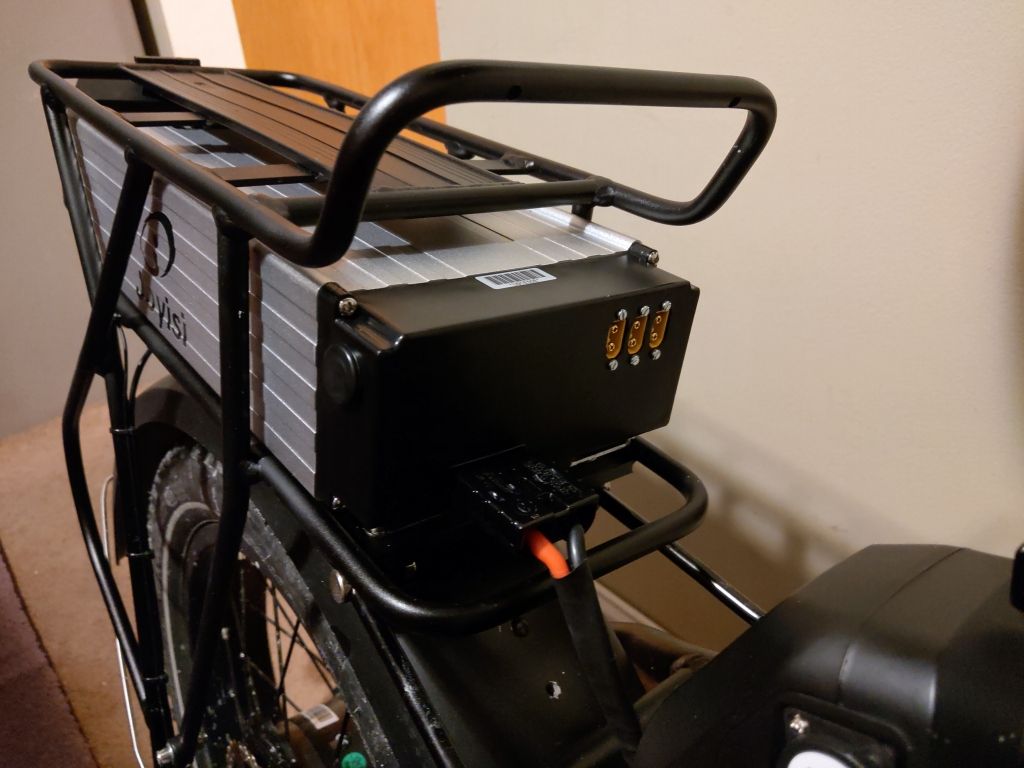
I was unable to find panel mount XT-90 connectors, so I went with XT-60 instead. There was room for 3 of them inside the battery housing, and most of the time was spent cutting the oddly shaped holes. I do have a "nibbler" for metal and plastic, but the material was too thick, so I had to use a drill and a melting tip on my soldering iron. It was messy. The ports are connected in parallel to the Anderson connector that came with the battery, but are after the key switch. This means that the battery can be turned off and no power goes to the accessory ports from that battery. However, if the front battery is turned on and connected, then that will power the accessories. The connections basically become a parallel bus, and power can be turned on or off from either source or both, and you can cut power to the accessories completely if needed.

The panel mount XT-60 uses a 2.5mm screw, and the 8mm length I found worked out perfectly. The XT-60 female side had no snap-in cable cover like the bigger versions, so I used heat shrink tubing. I'll a larger tubing to cover the connector later today. I'm considering soldering the cables at a 90 degree angle so they go straight up, but I'm not sure how that would work with heat shrink tubing. Let me know if you guys/gals have any ideas!

I also switched the plug for the 12v converter and the lead for my former rack bag battery. The converter works for up to 60 volts, so that was fine. The former rack bag battery is 48 volts, so I can't run it at the same time as the 52 volt batteries (even though there is some overlap in voltage range). However I can carry it as a spare, and plug it in when the other two batteries are depleted and turned off. Plugged into the accessory port, it is connected to the controller, and will run the bike fine by itself with a quick setting change to the minimum voltage (C12). Questions and comments are welcome 😁


#42
Rad Modifications / New battery rack, plus modifications
February 05, 2021, 04:19:52 PM
When I did my dual batteries, I loved the range, loved that it looked like there was no second battery, and liked how the package looked overall: just a simple e-bike with a rack bag.

However, I did not like not having any storage, which meant wearing a backpack or leaving the battery at home when I needed space.

I said in the dual battery article that, if I had to do it again, I'd use a rack battery. Then I upgraded the RadMini to 52 volts, and my stealth battery needed an upgrade as well. Unfortunately, the 52 volt versions of my battery were too wide for my current bag, meaning I'd have get a larger bag, and STILL have no storage. So I went ahead and ordered a rack and battery combo. I got the systems installed, and did not like it. Oh, the battery was fine: 52 volts, 20aH capacity, 40 amp BMS. The problem is that the rack itself was too tall, the design put the weight of the battery hanging off the back of the bike. Another problem was the entire weight of the battery, rack, and any cargo, rested on two mounting points.

So, I got out the angle grinder, and hacked it apart. Literally. I cut off the bottom mounting brackets, separated the legs that were welded to it, bent them into the position I wanted, pressed the tubing ends in my 12 ton press, drilled all new mounting holes, and redesigned the front stays so they could support weight instead of just preventing the thing from flipping backwards. The end result of this is the rack is now 3 inches lower, 3 inches further forward, the mass of the battery is more centered, and there are now 6 different mounting points supporting the weight. I can pick the entire bike up by the rack and it does not budge.

Now, it's not as pretty as the former rack, and the taillight/taillight/rearview camera combo looks far less elegant now, but it is functional, and I now have  range AND storage. Or if I want to go crazy, I can run a third battery in a rack bag, and have no storage again!

The battery itself is a solid unit in an aluminum case. Almost looks like an ammo case when you stand it up. It has a large Anderson connector for the power output, which I may change to double or triple XT 90 connections for expansion (3rd battery, 12 v converter, etc). I ran the power output to the connector inside the front 52 v battery mount, which I designed to be removable, so that bit was fairly easy. There are two charging ports top make it easy; one in front and one in back. The back of the battery has an integrated handle, charge indicator, and integrated taillight. The taillight is weak, and I don't think I'll be using it. There is no USB port on the battery, which is too bad. The key lock is by the front of the battery, and is used similar to the Rad battery key lock: OFF and battery unlocked, OFF and battery locked, and ON with battery locked. Unfortunately, you cannot remove the key in the ON position, which is something I dislike very much. I originally picked the black battery color because it would be more subtle, but changed it to silver because it would be cooler for the battery in the summer. That, and my gaming buddy said she liked the silver one better ;)

I did ride the bike with the rack installed but no battery, as the electrical work was not done and snow was on the way. A formal test drive with the new dual 52 volt batteries will have to wait, and we got snow, then snow, and more snow is coming.

Some indoor photos are below, and as usual, feel free to ask questions!

PS: Changed the post title to be more descriptive.


#43
Rad Modifications / 52 volt upgrade
January 31, 2021, 09:08:47 PM
I went ahead and upgraded the voltage to 52. The usable voltage range for 48 volt batteries is 15.6, and the voltage range for 52 volt batteries is 16.8, so even if there was no other benefit, the range should be slightly better. I really wasn't expecting much of a performance difference, but I was wrong. The new battery has a higher capacity discharge rate, and both the motor and the controller seem to like the voltage increase. The power levels now go up to 1820 watts, and if you twist the throttle at 15 miles per hour, you better hang on. I mean that literally!

The battery is a 52 volt, 13aH battery with a 30 amp output, and it fit in the stock location. For installation, I removed the connector from the Rad battery bracket, and soldered an XT90 connector so that the length would be about the same as the original. The upper and lower mounting holes lined up, but I had to drill a hole in the battery bracket for the middle screw. I can still remove the battery through the side, but since the bracket is not as slim as the original, it is a tight fit. The charging port is 3 pin XLR, and on/off is a switch instead of a key, so that's a bummer.

The battery does have a key, but that is to unlock it from the bracket. The two downsides to the install is that the bike can be turned on while the battery is NOT locked to the bracket, and the USB port on the battery is inaccessible due to the RadMini 4 frame style. I could move it up further, but that means losing the middle mounting screw. I can't use my rack battery anymore, and I thought of ordering a replacement 52 volt battery for the rack bag, but the I'd have to use a larger bag. I was conflicted because I REALLY like the stealth approach, but I wanted to actually use my storage bag for storage, so I ordered a rack battery to provide additional power. It won't look as nice, but it will give me a 20aH battery instead of 15aH like I have now. Photos are below, and on the display I had to change P5 to "0", and C12 to "7". Questions are welcome!
#44
I'm just checking to see if anyone is running their Rad bike with an upgraded controller and 52 volt battery.

I'm specifically looking for the correct 52 volt settings for P5 (power monitoring mode), and C12 (minimum voltage).
#45
Rad Modifications / Bafang motor upgrade comparison
January 19, 2021, 02:12:31 PM
I went ahead and bought the "upgrade" motor for my RadMini. It wasn't a need, and I bought it partly out of curiosity, but it provided a nice opportunity for testing and comparison.
If you spend any time on e-bike websites and forums, I'm sure you've heard the claim that Rad motors are not "true" 750 watt motors, and you need to buy an upgrade. This idea started in an online forum, then became popular through YouTube. Oddly, most opinions on this are based on looks, and while there are many things you can determine by looks, electrical specifications are not one of them. That being said, I do like the motor and will be keeping it. It's a high quality unit and worth the money, depending on your needs.


Side by side comparison


The Rad and upgrade motors do have some differences in design. Most notable is the magnet shell. This is narrower on the Rad motor, and wider on the upgrade. What does this mean? It means the shell is wider. What seems to throw people off is that the Rad motor has this empty space between the stator windings and the mounting plate. The upgrade motor does not have this space... or does it? It turns out the upgrade motor also has an empty space. It's just in a different location.


Although it seems the upgrade motor has bigger windings, in reality, it does not. The stator coils are the same size, as are the magnets.

The installation of the new motor itself went fine, with only one hitch: I was using a cast bit to remove the T-20 Torx head screws with anti-tamper pins, and the bit shattered. To avoid that, I purchased a forged Craftsman folding driver set, and used a butane mini-torch to soften the Locktite for the screws. The only settings changes required to the controller display was changing the speed pulse sensor (P2) from five to six.

Doing the math

I was a bit surprised when I could not get the motor specifications, so I had to do some testing on my own. Below are the results.

Stock Rad motor
Top speed: 23 mph
22 inch wheel RPM at 23 mph: 351.592
Motor RPM at 23 mph: 1757.96  (351.592 x 5)
Motor rating:  32.55 kV (approximate - electronically limited)
-------------
Bafang upgrade motor
Top speed: 27.4 mph
22 inch wheel RPM at 27.4 mph: 418.85
Motor RPM at 27.4 mph: 2094.26  (418.85 x 5)
Motor rating: 38.78 kV

The Rad kV rating is an estimate because it has a built-in limiter that starts reducing power electronically, so the motor is not free to reach it's natural RPM. The Bafang upgrade motor does not have this limiter, and this was one of the reasons I wanted to try it out. You can see the difference on the wattage being used at top speed: The Rad motor is only pulling a couple hundred watts at top speed, even though over a thousand watts is available, while the upgrade motor actually is pulling over a thousand watts at top speed.

Acceleration and hill climb tests

Tests with both motors were done on a RadMini 4 with dual batteries and a 35 amp controller, battery voltage at 54.3 volts, and the tires at 12 PSI. Performance would be better with more air in the tires, but since the first tests were done at low pressure, I kept them the same.

Original Rad motor 0 to 20 mph: 4.9 seconds
Bafang upgrade motor 0 to 20 mph: 4.9 seconds

Wait, what? You read that right, and I ran the tests multiple times. The motors had the same acceleration times. They are both a blast to ride with the 35 amp controller, with the Rad motor pulling ahead off the line and the upgrade motor catching it.

The hill climb test was a bit more subjective, but basically I drove up an absurd 28% grade berm for a freeway overpass. The Rad motor seemed to have a bit more low RPM torque, getting up without me touching the pedals. The upgrade motor had a little harder time, and although it made it, it was not as confidence inspiring.

In top speed, there was no comparison. The Rad motor can hit 23 mph if you change your settings, but the power starts being electronically reduced above 20. If you are already riding at 20 mph and go full throttle, the response is like "Well, ok, give me a minute" as it gradually gathers momentum on the restricted power. With the upgrade motor, it's prime time, and giving the throttle a full twist at 20 mph responds with the attitude of "Hold my beer!". Yes, it does top out at 27/28 mph because kV x voltage = RPM, but it gets you there decisively.

In conclusion, if you have off road or private areas where you can safely use the extra speed, the Bafang upgrade motor is worth every cent. If you need to keep it locked to 20 mph though, the Rad motor will do the same job and can handle the 1,600 watt power levels fine.
#46
Just curious as to what works well. I've tried a few things, with mixed results. Smartphones with OIS are thrown off by the intense vibrations, and it's hard to find a phone mount solid enough to make phones without OIS workable.

Currently, I'm switching up between two action cameras. One is an Akaso EK7000 4k action camera. The audio is acceptable, but the video shakes because this particular camera has no image stabilization (OIS or EIS). It was a gift, so no loss on my par, aside from having to buy another. One thing that makes the situation worse is that there are two ways to mount the camera. One is a waterproof box which kills the audio. The other is a snap-in frame that wobbles. The tripod mount on the bike itself is all metal and solid as, well, metal. The movement comes from the camera holder flexing.

My other unit is an old HTC RE camera which looks like an inhaler. It has image stabilization and better exposure, but the microphone is on top and catches all the wind noise, and I'm still working out ways to use a foam windscreen.

I went ahead and ordered the EK7000 Pro, which does have electronic image stabilization, and I also ordered a chest harness mount. We shall see how it goes, but what about you? What works and what doesn't?


#47
Just curious, as I was looking for 20 by 3.3 inch studded tires after having a bad fall on ice last week. I can find plenty of studded tires, just not in my size.
#48
I was glad that the Rad display has a USB port. However, its usefulness is limited by the output level, which is 0.9 amps. This is enough to charge most phones, but some accessories require more. My headlight and my heated vest require 3 amps to charge, meaning that they cannot be charged at all by the port on the bike. Upgrading the display and controller made it worse, as the new display only outputs 0.4 amp at 4.8 volts.

I was unable to find USB chargers or ports that worked on a 48 volt input. So, I ordered a waterproof 48 to 12 volt converter, and made a connector that will let me plug it into either battery, or plug into both batteries and act as a bridge. The connector is basically a male and a female XT90 connector soldered back to back, with the leads for the convertor soldered in. That handled the 48 volt side, and the convertor cannot be plugged in wrong. For the 12 volt output, I chose Anderson power pole connectors to make sure they never get plugged into the 48 volt system. You can plug any 12 volt load in here, but I went with a 12 volt automotive socket to be used with a double USB A charger with 3 amp output on both sockets. As a bonus, I can also plug in a 12 volt to 110 volt AC power invertor, as long as it's a small one. I foolishly went for the 10 amp convertor instead of the 20 amp version, which would have allowed for 240 watts of AC power.

Photos are below, and although I conveniently placed the convertor and socket in my rear rack bag (it works there with or without the rear battery), the convertor can be mounted under the rack or under the crank, since it is waterproof. The 48 volt source will need to come from the battery connectors on the battery mounting plate, and any splices done on the too-short convertor will need to be sealed (silicone plus heat shrink tubing), but it will mean you can run all kinds of automotive and motor cycle goodies, including lighting systems. Just putting this out there in case someone finds it useful!


#49
They are similar to the controllers offered by Bolton and Electro Bike World, but are quieter and more efficient, which is exactly what I'm looking for.
However, they are not plug and play, and come with collection of different connectors. However I'm good with soldering and figured everything out, except for the hall effect wiring. Do the Bafang motors use a standard color scheme for the 5 hall effect wires? I cannot seem to find a reliable wiring diagram.
#50
I was thinking of different ways to add a second battery when needed, and I thought of an old Popular Mechanics article about a man with two classic VW Beetles. One of them had the normal VW engine, and there were always suitcases in the back seat. The Second Beetle had a fiberglass replica of the same suitcases, which was actually an engine cover for a mid-engine Ford V8. I thought the idea was pretty slick, and since I always have a rack bag on my RadMini, I decided to install the second battery in the bag, and hide the cables.

The new battery is a 48 volt, 15 amp hour unit, and hooks in parallel to the existing Rad battery. Alternately, the bike will run fine with one battery or the other, but if you run both, you need to make sure the voltage level is similar before connecting them. The rule of thumb is run together, charge separately, and I think I've seen that mentioned in these forums as well. The neat thing is that, if you want, you can use one battery while the other is being charged, and just swap them as needed. You still have to remember to balance the voltage before putting both back in though ;)

The basic overview is that I removed and disassembled the Rad battery bracket, soldered the new wires to the terminals inside the bracket, put it together, and ran the wire through the rack support tube itself, then into my rack bag after adding an XT90 connector for the new battery. This combo brings my battery capacity from 14 Ah to 29 Ah, and should extend my range to 70 or 80 miles. Photos are below and I'm open to questions, but keep in mind it snowed where I live, and range testing might be delayed for a bit!

#51
General Chat / Riding Rad in the snow!
December 01, 2020, 09:33:03 AM
We had a few inches of snow last night, so after I cleaned the cars and shoveled the walk, I got curious about riding my Rad in the snow. Granted, I used to ride bikes in the snow when I was a kid, and I was pretty good at it, but I've never done it on an e-bike.

Preferring to be cautious, I wore my gloves and helmet, and put my seat down so I could put both feet on the ground.
Plus, with the seat lower, I don't have as far to fall!  ;)
The snow was on top of hard slush mixed with ice, but no polished ice or black ice. I took it easy, dragging a foot on the sidewalk as I tested the throttle and brakes to see how much traction I had. I was pleasantly surprised. I pulled both feet up and went faster on the sidewalk for a few hundred feet, then turned around and came back on the road, hitting about 17mph with confidence. The RadMini, with the stock tires, did exceptionally well with lots of traction. I'd be comfortable going for a longer ride in weather like this, and would even take it to a state park if I had the time today.

Has anyone else ridden Rad in the snow? If so, how did it go?
#52
Rad Modifications / RadMini 4 Controller upgrade review
November 08, 2020, 07:39:23 PM
RadMini 4 upgrade: Having more fun, but enjoying it a bit less


While that may sound contradictory, it was the best way to sum up the results of the RadMini controller and display upgrade I recently performed.
The upgrade was all that they said and more, delivering much more power and torque than I expected. It was definitely fun, but was not without a few caveats.
The installation itself was plug and play for the cables, and the only issue was the cable from the controller to the display. It was was a bit short, and I had to route that cable across the front of the controller to reach. I was concerned about the bike being scratched by the controller box, so I placed adhesive rubber pads on the controller to prevent that, and secured it with three heavy duty cable ties. The cables attached fairly neatly to the stock tie down points.


The display would normally be easy, but it was more complicated on my particular bike because of an aftermarket handlebar extension bar I use for my headlight. The original display mounting points are snug against the stem, while the new ones are slightly wider, occupying the only usable space for my handlebar extension. What I had to do is cut the extension bar mounts and screw them to the new display mounts using longer screws.


The software setup was fairly easy, though you need to watch a video to learn how to access the settings for your particular bike. I wrote out the instructions and the settings for the RadMini 4, if anyone is interested. It should be noted that the top speed remains about 20 mph, even when changed in the settings. I tried minor and major changes, and even when set to 40 or 70 kph, it topped out at the same speed and you can feel the motor back off.

Usage
For controls you get the same three button control pad, with a few differences in operation. The middle button is power on/off with a long press, or cycling thorough display screens with a short press, showing different data such as max or average speed, trip odometer, battery voltage, etc. Up and down buttons change the power assist levels with a short press (also same as stock). A long press on the up button turns on the lights, and this is much easier than holding the middle and up buttons, which is difficult when wearing gloves. A long press on the down button activates... cruise control!

For cruise control, you need to be going a steady speed above 5 mph (7 kph), either by pedaling or using the throttle. Then you need to hold the down button for what seems like a very long three seconds, then a "C" will appear where the PAS level usually displays. At that point, you just let go and steer, and the bike maintains that speed. I set mine to 11 mph, and  it held that speed even going up a steep hill, only dropping to 10.8 mph for a moment. The cruise control cancels if you use the brakes or throttle, or if you pedal and the power assist kicks in. It does not have the ability to resume the set speed like a car, but I'm not complaining!

Riding experience
So, how is riding now? To be honest, I was a bit stunned. The motor now peaks around 1200 watts, and you NEED both hands holding on. It pulls hard and rushes to top speed, and you may even leave normal car traffic behind for a bit at intersections. I blipped the throttle when coming into the house, and it did a burnout on the kitchen floor. Hills are cake now, and I encountered a grassy hillside that was shaped into three tiers because it was so steep. The Rad just drove right up, and the front wheel kept coming off the ground. If anything, the upgrade dispels the myth that the Rad motor is not a 750 watt motor. Over one thousands watts and making the bike fishtail as it spins the back wheel and flings dirt behind it. Plan on taking off when the light changes by pedaling and using the throttle? Better know how to handle a wheelie! It's fun, but be careful not to scare any pedestrians.

It is quite a power boost from the stock Rad riding experience, but is it all good? If I was going to hang out with other e-bikers and compare specs or drag race, the upgraded controller is the way to go. However for everyday living, and depending on your riding style or preferences, it might be a different story.
I think if I was going to look at the biggest difference between a stock Rad and the upgraded version, I'd point to the philosophy behind the power delivery and programming. As delivered, a stock RadMini 4 is easygoing, approachable, and it delivers power in a smooth, and predictable manner. This philosophy extends to the way you get that measured assist at every PAS level up to the top speed, and after you pass that top speed, the power gently rolls back in when you get back below the speed limit. The motor control has a flow to it that encourages pedaling, and you enjoy the ride and don't think about the technical aspects of it all, aside from knowing the throttle is always there to give you a boost no matter what.

With the upgraded controller, you are hit with the impressive power, but it seems like it was made for those who prefer a moped style experience. The power application is abrupt for both PAS and throttle, and the only way around it is a deep dive into the settings. You can't use the throttle one handed because it will pull hard enough to lose control. You can't have a passenger on the back and use PAS 5, because they will likely be launched off the back! Granted, if you have a passenger who is annoying, this could be considered a feature ;)

Speaking of annoying, another odd quirk is the individual pedal assist speed limits. Set the power assist to level 1, take off, and at 9 mph the motor turns off, leaving you with no pedal assist or throttle. It's as if Gandalf is sitting on your handle bars, looking at the the speedometer trying to get to 10 mph, and he's saying "You! Shall not! Paaaaass!". You would think it wouldn't be much of a problem, but here's the thing: Cycling is a dynamic experience, especially in hilly areas. You naturally gain speed on the downhill, and it builds momentum to help you partway up the next hill. But with the speed limit throwing a wet blanket on all that, you find yourself at the bottom of the hill with very little momentum gained, and you have to make up for it on the uphill because of the inertial you didn't get. At the recommended settings, the upgraded system fights against hills, while the original Rad system flow with them. Despite having much more power now, my laps around the usual 8 mile course I take were slower, and the ride left me more tired.

Kyle to the rescue
I was not successful in getting information elsewhere, so I reached out to Kyle of Bolton Ebikes. Kyle has THE best video on the controller upgrade displays, and he pointed me to setting P3, which is the "Power assist control mode". The default setting is 0, which places an individual speed limit on each PAS level, and it also ties the throttle to the PAS limits. Changing P3 to 1 sets the speed limit to the general top speed, and disconnects the throttle from the PAS levels so it works all the time up to full power, regardless of the PAS level. I agree with Kyle that this is the more "intuitive" way to set it.

So this fixed two major issues, but two issues remained: Noise, and poor battery life. Last week I rode this same bike, with the original controller, several times through a metro park and a connected state park. After 32 miles, the battery was at 40%. With the upgraded controller, the battery was empty at 24 miles.

Then there is the noise. The stock Rad setup is fairly quiet for a geared motor, and this is a result of the refined programming and optimization. Riding though the woods with an occasional pedestrian, they would either not hear me approaching, or hear the blended sound of the tires and motor.. With the upgrade, the motor is loud and rough like a stepper motor, and people turn around to see what the noise is. Now, I played with the settings further, and found that I could change the maximum power settings, and also how aggressively the bike accelerated, but nothing could get rid of the noise, which is bad enough to rattle my fender supports.

I ended up swapping the controllers and displays multiple times to make adjustments and comparisons. You CAN make the upgrade controller behave almost like the original Rad controller, but what's the point of the upgrade then? True, you could mimic the Rad performance, then change the settings to high performance when your buddies want to go off-roading or horsing around. But, you still have to deal with the noise and battery life. In the end, it was mostly the noise that made me go back to stock.

In conclusion, I like many aspects of the controller upgrade. The acceleration is great, hill climbing is amusing, and off-roading is almost like having a 2 stroke blasting though the leaves and gravel. Whether or not this upgrade suits you depends on your use, and it would be great for local commutes, running errands, hauling groceries, dealing with exceptional hills, or just having fun on local trails. It it a high quality and reliable product, and if it fits your style, get it. But, it's not everyone's style, and if you are more into cycling for pleasure, getting back into shape, or need to cover long distances, the original Rad setup may suit you better.

PS: Just as little update on the status. With winter now being on the scene here, I've decide to leave the upgrade in place. The 25 amp version was not worth the range loss and noise, and if that was all I had I'd probably be sticking to the original controller all the time. However, the 35 amp version is more efficient than the 25, and the extra power makes the noise more tolerable. The other factor is there are fewer other people sharing the bike paths, and with more time being spend on desolate routes, I'm using the cruise control more. We shall se when summer rolls around, and more people are enjoying the peace and quiet. But for now, the extra power comes in handy slogging through mud and snow.
#53
Rad Modifications / BR35 Headlight upgrade and comparison
November 01, 2020, 07:24:48 PM
I was out riding at night again, and came to a nice spot to take some photos comparing the different modes of my main headlight, and also show it relative to the stock Rad headlight on the RadMini 4. The aftermarket headlight is the Nitecore BR35 with a total of 1800 lumens (which I've never used at full power!). The photos were taken with the camera ISO and shutter speed set manually (f/1.8, ISO-249, exposure 1/10 sec).

I normally turn on the stock lights when dusk approaches, so people can see me, then I'll turn on the Nitecore when I need to see better. The stock headlight is a good unit with a controlled beam so that it doesn't blind others, but the beam is a little TOO tight, lighting up a small patch in front of you, and nothing else. The BR35 has two lights, with the "low beam" being mounted below with a diffuser, and the body of the light acts to block it from blinding others when it's aimed properly. The diffuser spreads the light around, and lights up the ground all around the front wheel. The "high beam" is in the main body of the headlight, and gives a round beam pattern with good throw. A remote control button turns the light on and off, and switched between the beams. There are four brightness levels, and I normally use level 2, and switch to level 3 when I need extra power.

The headlight has three modes:
City: Low beam on by default. Remote button activates high beam, but only for three seconds.
Road: Remote button toggles between high and low beams.
Trail: Both beams on by default. Remote button toggles between both beams, or low beam only.

Below is the stock Rad headlight. I keep this light because it works well and is always there.


Below is the Nitecore headlight on low beam only. It lights up the area, including the front wheel, and even your shoes.


This is the high beam, which is mostly for long distance, but still lights up more than just the pavement.


And lastly, this is the high and low beam together in Trail mode.


In all, this setup works out well for my late rides (sometimes past midnight!). The Rad light is reliable as the sun and helps others see me, while the Nitecore handles lighting up the road ahead. If I were to change anything, I'd like the cutoff point of the low beam to be lower. As it it, and have to tilt the light down when riding the streets, then aim it up when on lonely paths. The mount for the light clamps to my handlebar extension with rubber pads, and I keep it tight enough to keep it still, but loose enough so I can tilt it manually. Let me know if you have any questions!
#54
General Chat / One benefit of a hub motor...
October 23, 2020, 09:50:00 AM
Is bringing you all the way home if you suffer drivetrain damage!

Last night I was trapped on a bike trail by a sudden water main break. The trail is sandwiched between a highway and a fence, and the only way out was now a running river. I forded it on the bike, cutting though an opening in the fence to escape into a parking lot, and the derailleur caught on a curbstone. It was bent enough that the chain was rubbing against the tire. I shifted to a higher gear so the chain wouldn't rub, then went the rest of the way home on throttle only, with the hub motor unaffected by any drivetrain damage. Mid-drive have advantages, but I would have had to walk for miles if I had one last night!

I arrived home with ease, rested, then set to work on the derailleur. The hanger was not bent (was going real slow), but the jockey and idler pulley cage was. I bent every thing back to proper alignment, then reset the limit screws and re-indexed the system. It's working fine now, and I'm ready for my next ride!

#55
General Chat / How bike-friendly is your community?
September 13, 2020, 11:56:25 AM
Our location in SE Michigan is good on some points, not so good on others.
Positives:
1. We have lots of paved bike paths and mountain bike trails.
2. Several bike path have parking lots to leave your car in.
3. Most people react with smiles and greetings when approaching.
4. Most drivers will wait for you at intersections.

Negatives:
5. Few stores have bike racks, or have a rack in a poor location as an afterthought.
6. The restrooms along public bike trails are either closed, or randomly open. I've had to cut rides short for this reason.
7. Some trails and sidewalks are nice, then terminate suddenly. One sidewalk near me terminates in a four foot drop.
8. Some freeway overpasses are impassible by bike, with no sidewalk and no space apart from very aggressive traffic.

How is it where you live?

#56
General Chat / 200 miles in two weeks!
September 04, 2020, 08:47:02 PM
203 when I got home, actually, but it's been great fun. Today was my longest single ride, and probably the most difficult. 32 miles over hilly paths, dirt, gravel, grass, and the occasional unwanted mud and muck. Unlike my previous ride where I didn't touch the throttle for twenty miles, I used the throttle whenever I needed it this time, and gave myself a break from pedaling when I felt like it. Considering the usage and terrain, 32 miles is not bad, and the last battery bar was blinking as I approached home at 15 mph on throttle only.

Only issues was a momentary clicking which I believe was a spoke, and a strange sound like a kitten mewing and singing. At first I thought it was the controller, but it seems like it was a ringing vibration of the front fender support or brake disc. It stopped after a mile, but I'll investigate later.

Still loving the bike and making new friends, and I think I've "sold" two Rad bikes so far to people who had lots of questions.
#57
Pride & Joy / Hello from Michigan!
August 28, 2020, 09:32:05 AM
Just saying hi for my first post. My RadMini 4 was delivered a week ago, and I've ridden it 91 miles (146 km) so far. The experience has been great so far, with the only mechanical issue being the frame joint creaking. The sidewalks and paths are a bit rough where we live, so I have not locked the front fork out, and I lowered the tire pressure down to 22 PSI (151 kPa) to deal with the bumps and cracks. Often the pavement just ends, and going from smooth to gravel or grass is a firm reminder that this is a hardtail bike!

I'm a former marathoner who now has metal plate and screws in my leg, and knees that are just worn out. This is the first time I've been able to ride in years without significant pain. My RadMini 4 is a US specification model with the 750 watt motor and throttle control, and it pulls quite nicely with the smaller diameter tires. Despite my knees, I've ridden up significant hills at power assist level 3 using in 4th gear. Mileage has been good, and I've gotten 41 miles (61 km) on one charge with heavy use.

I wanted a Rad rack but it was unavailable, so I bought a universal one and made my own vertical supports for strength. The original supports were adjustable, and I was concerned about the impact of bumps overwhelming the single set screw on each side of the rack. The new supports are one piece, and are attached to the inside of the frame stays to improve the geometry. I know Rad warns you not use use other accessories, but I can't buy theirs, and this is a necessity. On the bright side, the rack is stronger than theirs, and the higher position gives more visual balance to the bike.

Below is a photo on my first "long" ride out to a local lake.